Celebrate with challah
Challah is loaded with history, meaning and deliciousness.

Challah is commonly baked Fridays in Jewish households anticipating Shabbat, the day where no works gets done. Doesn't that sound luxurious? Take a day free from work to contemplate life, celebrate family, and savour a slice of Challah? Imagine, guilt-free relaxation? What follows is an improvisation on the original with added rum-soaked dried apricots.
If you got a new KitchenAid mixer for Christmas, here is a great recipe to kick off the new year. If you didn't get a new mixer, you can break out the $350 you've been squirreling away for January sales to buy what you want. If you already have a Kitchen-Aid, well, here is one more thing you can make.
You don't need a KitchenAid to make Challah, or any other bread for that matter, but it will make it easier. And if you need justification, baking your own bread and buns will save your grocery bill at least $7.50 every week if you are a two loaf and a dozen buns-a-week family. Multiply that by a year of 52 weeks and you've got $390. You should be able to pick up a Professional grade KitchenAid on sale in January for that amount.
My family loves this new version of this ancient bread. A friend of mine shared her Challah recipe and ask me to correct it. She complained that the recipe required significant additional flour to make the bread. In fact, what the recipe needed, was kneading, and lots of it. I run the kitchen aid on number 4 for nearly ten minutes when I make this bread. Hand kneading to get the same result would be a cardio workout.
I carefully weigh the ingredients and embellish with rum soaked apricots. You can leave the apricots out altogether or substitute raisins if you like. Rum of course is optional.
I learned to bake in my mother's kitchen using cups and teaspoons, but at professional cooking school we used scales for everything, even water. I have fully adopted baking by weight at home, especially for breads. I strongly recommend buying a one-kilogram electronic scale that measures in grams.
What follows is the Challah recipe in grams, but I've also included cups if you don't yet have a scale. I didn't make this video, but it is a great visual summary of what it takes to make Challah.
Challah with Saffron and Maple Syrup
Tools and Equipment
- Baking stone
- Cast iron frying pan
- Bakers peel or rimless baking sheet
- Silicon paper
- Cooling rack
- Spatula Silicon or other suitable baker’s brush
- KitchenAid mixer with a dough hook (or you have a lot of hand kneading ahead)
Ingredients
- 1 cup or 250 Grams of boiling water (day 1)
- 1 cup or 160 grams of whole dried apricots (day 1)
- 2 Tablespoons / 30 ml dark rum (day 1)
- Water to top up the liquid to 1 cup or 250 grams (day 2)
- 1 8-gram packet of Fleischmann's Yeast, or 10 Grams of Bulk yeast (I bake breads weekly and keep a pint jar of dry yeast in my pantry)
- 3 cups or 570 Grams of Robin Hood all-purpose flour
- 1 ½ tsp or 8 grams coarse sea salt
- ½ cup or 160 grams of maple syrup (I used #2, the dark stuff)
- ¼ cup or 55 grams of grape seed oil (olive or canola will substitute fine)
- 2 large whole eggs, room temperature. (one goes in the bread dough, the other one yolk only for egg wash)
- A pinch or two of Spanish saffron for colour Poppy or sesame seeds for topping
- 1 Tablespoon milk for egg wash
- ½ cup of ice cubes
- Olive oil, for coating the dough while fermenting.
Method
1. The day before you bake Challah, place apricots in a small bowl and cover with 1 cup / 250 g of boiling water and an ounce or 30 ml of dark rum. Cover and let hydrate overnight.
2. The day you bake bread, drain the apricots and capture the liquid, top up the liquid to 1 cup or 250 grams.
3. Chop the apricots into pieces the size of corn kernels and proceed to mix dough.
4. Place the ceramic baking stone on the middle rack of the oven and a 12" cast iron skillet just below it.
5. Preheat oven to 350 F.
6. Measure all of the ingredients.
7. Rub a pinch or two of saffron in the palm of your hand, add this, salt and the water to the mixing bowl and stir well to dissolve.
8. Add all the other ingredients and stir with a stiff wooden spoon until roughly mixed. Cover with a towel and let sit for 20 minutes.
9. Attach the dough hook to the kitchen aide, and mix on # 2 for three minutes to combine the ingredients. Shut off the machine and scrape the sides with a spatula every 30 seconds or so until everything is well incorporated. Then mix on #4 for 7 minutes until the dough gathers around the dough hook and frees from the bowl sides. The dough should be completely smooth except for apricot chunks.
10. Drizzle with olive oil (about 2 tsp / 10 ml) to free the dough from the sides of the bowl, cover the top of the mixing bowl with a dinner plate until the dough doubles in volume.
11. When doubled, scrape out onto a floured board, divide in three equal pieces. (I use my scale to even up the pieces to about 365g, each.)
12. Roll dough into ropes about 30-35 centimeters (12-14 inches) long.
13. Place the silicon paper on the baker's peel or rimless baking sheet. (This will make it easier to slide the loaf onto the ceramic stone once the loaf has risen.)
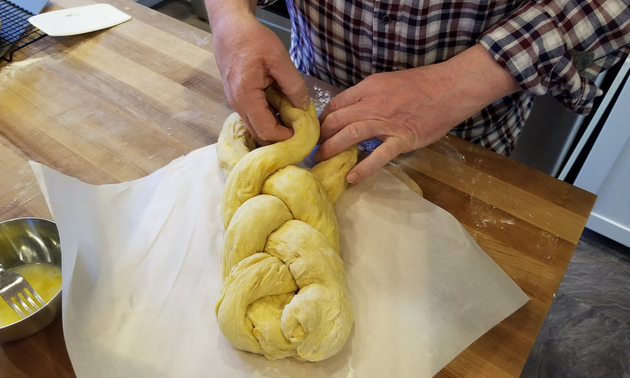
14. Braid the dough.
15. Mix one egg yolk and a tablespoon of milk, beat with a dinner fork and brush egg wash over the loaf.
16. Sprinkle with poppy seed.
17. Cover with silicon paper and a tea towel and let rise to near double or about 45 minutes.
18. When risen, carefully remove the towel and paper cover.
19. Slide the loaf onto ceramic baking stone, using a baker's peel or a rimless baking sheet.
20. Add ½ a cup of ice cubes to the skillet. This burst of steam boosts the initial rising, and moistens the crust to allow additional expansion, then helps seal the crust.
21. Bake at 350 F for 35-40 minutes. This loaf might need another 5 minutes in the oven to finish it.
22. When fully-baked, remove the loaf from oven with the baker’s peel and place on the cooling rack.
Now is the hard part. Wait. Just until the bread is cool enough to touch. The butter will still melt on a slice. Enjoy a quiet day of rest, your family and some more Challah. And maybe a bit of jelly?


